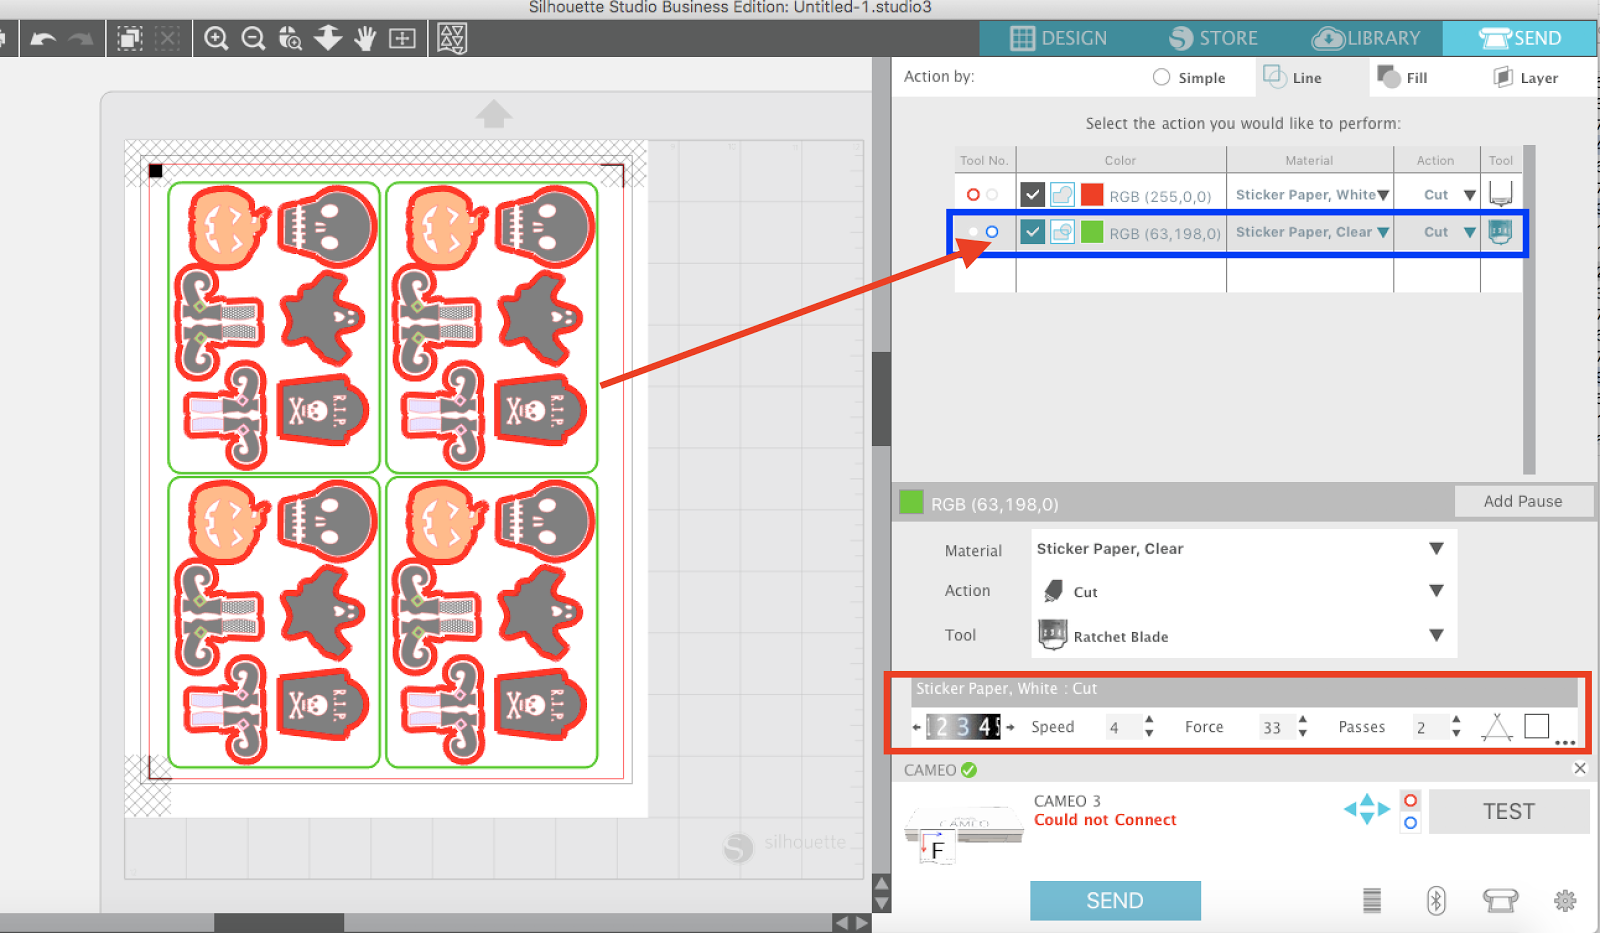
Zicoto sticker paper has become a popular choice among DIY enthusiasts, small business owners, and anyone who loves crafting with stickers. Known for its durability, vibrant colors, and versatility, Zicoto sticker paper is compatible with a range of printers and cutting machines, including the ever-popular Silhouette Cameo. But to achieve perfect cuts, you need to know the right settings!
In this comprehensive guide, we’ll walk you through everything you need to know about Zicoto sticker paper cut settings Silhouette machines. From setting up your machine to understanding different cut settings, this guide will help you master the art of cutting Zicoto sticker paper with precision.
Why Choose Zicoto Sticker Paper?
Before diving into the technicalities of cut settings, let’s understand why Zicoto sticker paper is such a hit:
- High Quality: Zicoto sticker paper is durable and offers a glossy or matte finish, making it perfect for professional-looking stickers.
- Inkjet Compatibility: It’s designed for inkjet printers, ensuring your stickers come out vibrant and high-resolution.
- Water-Resistant Options: Some Zicoto sticker papers are water-resistant, adding extra durability.
Whether you’re creating labels, custom stickers, or decorative designs, Zicoto sticker paper is an excellent choice for both personal and professional projects.
Getting Started: Essential Tools and Setup
Materials Needed
To work with Zicoto sticker paper on your Silhouette machine, make sure you have the following items:
- Zicoto Sticker Paper: Select your preferred finish (glossy, matte, or transparent).
- Silhouette Machine: The Silhouette Cameo 4 is a popular choice, but these settings can apply to earlier models too.
- Cutting Mat: Ensure you have a sticky cutting mat to hold the sticker paper in place.
- Silhouette Studio Software: Install the software to customize your cut settings.
Setting Up Your Silhouette for Zicoto Sticker Paper
- Load Your Sticker Paper: Place the Zicoto sticker paper on the cutting mat, aligning it with the top left corner. Make sure it sticks well to avoid shifting during the cut.
- Insert the Mat into the Silhouette Machine: Load the mat carefully so the machine recognizes it.
- Open Silhouette Studio: This is where you’ll adjust the cut settings to match Zicoto sticker paper’s thickness and material properties.
Best Zicoto Sticker Paper Cut Settings Silhouette
Finding the right Zicoto sticker paper cut settings Silhouette involves testing, but here are some general guidelines to get you started. Adjustments may vary based on whether your sticker paper is glossy, matte, or transparent.
Cut Settings for Glossy Zicoto Sticker Paper
Glossy sticker paper has a slightly different texture than matte, requiring specific adjustments for clean cuts.
- Blade Depth: Set your blade to a depth of 3-4. Glossy paper is generally a bit thicker.
- Force: Start with a force setting of around 14-16.
- Speed: A lower speed of 3 works best to prevent tearing.
- Passes: Use 1 pass for regular stickers, but consider 2 passes for intricate designs.
Pro Tip: If the stickers don’t cut all the way through, slightly increase the force or blade depth until you find the sweet spot.
Cut Settings for Matte Zicoto Sticker Paper
Matte sticker paper tends to be thinner than glossy, so you’ll want to use slightly lower settings.
- Blade Depth: A blade depth of 2-3 should suffice.
- Force: Set the force between 10-12.
- Speed: A speed of 4-5 works well for matte paper.
- Passes: 1 pass is generally enough, but for complex cuts, 2 passes may be necessary.
Pro Tip: Matte paper doesn’t reflect light, making it easier for optical sensors to detect registration marks, so you might find the cut more accurate.
Cut Settings for Transparent Zicoto Sticker Paper
Transparent sticker paper presents unique challenges as it’s often more delicate.
- Blade Depth: Keep the blade at a depth of 2.
- Force: A force of 8-10 works well for transparent materials.
- Speed: Keep the speed low, around 2-3, to avoid snagging.
- Passes: 1 pass is generally enough, but use 2 passes for intricate details.
Using Registration Marks for Precise Cuts
Registration marks are essential when creating stickers with printed designs. They help the Silhouette machine accurately read and cut around your designs.
- Enable Registration Marks: In Silhouette Studio, go to the “Page Setup” panel and enable registration marks.
- Position Your Design: Place your sticker designs within the boundaries of the registration marks.
- Print with Registration Marks: When printing, make sure registration marks are visible.
- Align on Cutting Mat: Carefully align the paper with the registration marks on the cutting mat.
This process will ensure your designs are cut precisely, giving your stickers a polished, professional look.
Troubleshooting Common Issues with Zicoto Sticker Paper
Stickers Not Cutting All the Way Through
If your stickers aren’t cutting completely:
- Increase Blade Depth: Slightly adjust the blade depth and test again.
- Increase Force: Incrementally increase the force setting in Silhouette Studio.
Stickers Tearing
Tearing can result from too much force or a dull blade.
- Decrease Force: Lower the force setting to see if it prevents tearing.
- Change Blade: If the blade is old or dull, replace it.
Machine Fails to Detect Registration Marks
If the machine isn’t recognizing the marks:
- Check Lighting: Ensure there’s adequate light, as shadows can interfere with the machine’s sensor.
- Reposition the Paper: Realign the paper on the mat, ensuring registration marks are fully visible.
Advanced Tips for Cutting Zicoto Sticker Paper on Silhouette
Double Cut for Complex Designs
For intricate stickers, enable the “double cut” option in Silhouette Studio. This setting tells the machine to cut each line twice, making it easier to lift complex designs without tearing.
Offset for Clean Edges
Adding a slight offset (around 0.05 mm) can help create a clean outline around your stickers, especially for designs with fine details. This option can be found in the “Offset” panel in Silhouette Studio.
FAQs: Zicoto Sticker Paper Cut Settings Silhouette
Q1: What are the ideal Zicoto sticker paper cut settings Silhouette machines?
A: For glossy Zicoto sticker paper, set the blade depth to 3-4, force to 14-16, speed to 3, and use 1 pass. For matte sticker paper, set blade depth to 2-3, force to 10-12, speed to 4-5, and 1 pass. Transparent paper typically requires a blade depth of 2, force of 8-10, speed of 2-3, and 1 pass.
Q2: Why is my Zicoto sticker paper tearing during the cut?
A: Tearing often occurs due to excessive force or a dull blade. Lower the force setting in Silhouette Studio or consider replacing the blade if it’s been used for a long time.
Q3: Do I need to use registration marks for Zicoto sticker paper on Silhouette?
A: Yes, if you’re printing designs on the sticker paper before cutting, registration marks help the Silhouette machine align and cut precisely around the printed designs.
Q4: What’s the best way to test Zicoto sticker paper cut settings Silhouette?
A: Start with a small test cut on the corner of the sticker paper. Adjust the blade depth and force incrementally until you achieve clean cuts without tearing or incomplete cuts.
Q5: How do I get Silhouette to detect registration marks on Zicoto sticker paper?
A: Ensure there’s sufficient lighting, as shadows can interfere with registration mark detection. Make sure the paper is correctly aligned, with marks fully visible on the cutting mat.
Conclusion
Mastering the right Zicoto sticker paper cut settings Silhouette machines can make all the difference in your sticker-making projects. By following the recommendations for blade depth, force, speed, and passes, you’ll be able to create high-quality stickers with ease. Remember, testing is key—take your time to experiment and find the ideal settings that work for your specific project.
Whether you’re a beginner or a seasoned crafter, Zicoto sticker paper offers endless possibilities for creativity, and with the right Silhouette settings, you’re on your way to making professional-looking stickers.